Thursday, December 24, 2009

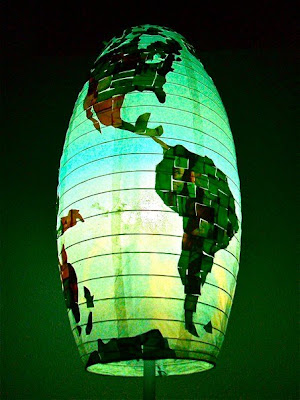
Collage Globe Paper Lantern

Every Ikea whore and indie kid has had a cheap Japanese inspired paper lantern at some point.  While they may not be the best utilization of wattage, they sure do add a nice soft glow to any homespace.    If you really want to impress any potential conquests, then jazz up your bland white light with a custom collage, such as a world map.  Add a light bulb that is gentle on the eyes, and your soon-to-be lover's visibility of your face, and get ready to seal the deal.  Combined with some Two Buck Chuck and the Garden State soundtrack, and you're bedroom is now a fully loaded lair of seduction.  Bowchickabowkowwwwww!


You'll Need
    •    Paper Lantern Light Shade
    •    Pencil and Eraser
    •    Scissors
    •    About 300 1" squares
    •    Elmer's Glue or Modge Podge
    •    Paint Brush
    •    Crystal Clear Spray Enamel
    •    Blue Light Bulb

Heres How
  1. Lightly sketch an outline of the continents on your paper lantern.  It helps to use a picture, map, or globe as a reference.
  2. Cut your collaging paper of choice into approximate 1” by 1” squares.  I used pictures that I tinted green using a photo editing program. You can use anything from photos, to magazines, to construction paper.  It you want your continents to be green stick with green paper.
  3. One by one apply the collage squares inside your sketched outlines for the continents using your glue or modge podge and paintbrush. 
  4. For the rounded edges and curves of the borders of your continents, cut down the edges of your collage squares to match the outlines.
  5. When you are all done and satisfied with the shape of your globe, spray on a light coat of Crystal Clear Spray Enamel.  Allow drying time.
  6. Screw in your blue light bulb, flip the switch, and enjoy you stud!
Monday, December 14, 2009

DIY Sushi

Who doesn't love some good sushi?  Actually, a lot of people don't... but they're fucking crazy!  

You'll Need
·      Strainer
·      Rice Cooker
·      Cutting Board
·      Sharp Knife
·      Bamboo Sushi Rolling Mat
·      Rice Paddle Spoon
·      Small Bowl of Water
·      Sauce Brush
·      Sushi Fillings of Your Choice
o     Crab
o     Shrimp
o     Fish
o     Eel
o     Cucumber
o     Avocado
o     Radish
o     Krab
o     Spicy Sauce (AKA Cock Sauce, thanks to the regal rooster that adorns the red bottle)
o     Etc.
·      Sushi Seaweed, Nori
·      Rice Vinegar
·      Sushi Rice (approx. 1 cup per roll)
·      Wasabi Paste
·      Soy Sauce
·      Pickled Ginger
·      Chop Sticks!


Here's How


1.    Using your strainer, thoroughly rinse your sushi rice.  This is important for making it sticky, icky, icky!
2.    Put the rice in your rice cooker.  Follow directions on your rice for water proportions and cooking time.
3.    While your rice is cooking, start chopping your ingredients.  Cut all vegetables and proteins into long thin strips.

4.    When rice is done, top with a couple splashes of rice vinegar.
5.    Roll out your bamboo mat so it is flat.  Place sushi nori on top of the mat. 
6.    Sprinkle sesame seeds over the sushi rice.
7.    Using your rice spoon, remove the rice from the cooker and spread a thin layer of rice on top of your sushi nori.  Spread rice to all the edges.
8.    Place your proteins and vegetables at one end of the seaweed, lengthwise. 
9.    Roll the end of the bamboo mat with your fillings, pressing the ingredients inside the cylinder-shaped sushi firmly with your hands.
10.  Using your sauce brush, paint the exposed edge of the nori with water.  This will help seal your sushi.
11.  Cut sushi into inch thick rolls.  If you want yours spicy, add a drop of Cock Sauce to the top of each roll.  After all, some like it hot!
12.  Serve with soy sauce, wasibi, and ginger.  And don’t forget to eat with your chopsticks you poser!

Sunday, December 13, 2009

Painted Moroccan Table

The colorful patterns of Moroccan art and furniture is revered for its mesmerizing geometry and symmetry.  Add a classy ethnic flare to your apartment by finding a cheap or free table and painting your version of a classically unique Moroccan design.


You'll Need
·      Round or Hexagonal Side Table
·      Painters Tape
·      Various Acrylic Paint Colors
·      Paint Roller
·      Various Paint Brushes
·      Pencil & Eraser
·      Ruler
·      Crystal Clear Spray Enamel


 Here's How

  1.   Find a small round or hexagonal table.  I recommend Craigslist.  I got mine for $9.
  2.  Put painters tape around the edge of the table.
  3. Apply your chosen base coat color with a paint roller or a large brush.  After you have an even coat, let dry.  I think a red or burgundy works best to contrast against your colorful design.
  4.  Decide on a design for your table top.  It is easiest to look up a Moroccan table top or painted design online and work from that as a reference. The design will look the best if you start with one point in the middle and separate it into pizza like slices, each with repeating design.
  5. Using the pencil, eraser, and ruler, lightly sketch the symmetrical design you have chosen on top of the dry base coat.
  6.  Paint your design on the table.  Don’t be afraid to get creative.
  7.  Once dry apply a coat of Crystal Clear spray enamel. 
  8.  Adorn with various Moroccan accessories like teapot, or hookah.  Enjoy!

Tuesday, December 8, 2009

Ganesha Statue with Small Planter

I have always been a lover of elephants, but on a recent trip of mine to India I fell in love with a whole new depiction of my favorite tusked mammal, that being the Hindu God, Ganesha.  It wasn't just Ganesha's uncanny resemblance to the elephant the caught me captivated, it was what he represented. According to Hindu religion, Ganesha is not only the remover of obstacles, but also the patron of art, science, intellect, and wisdom. That combined with my boyfriend's excessive confidence in my artistic abilities, and comment "you could make a statue", as though it were some simple crafty task, lead me to take on the mother of all kitschy art projects... the Ganesha statue.


You'll Need:

  • About 2 Weeks worth of otherwise-would-be-recycled cardboard (Boxes, paper towel and toilet paper rolls, egg cartons, etc.)
  • Masking tape (Must be masking, plastic tape will not work)
  • Scissors
  • 1 Balloon
  • Papier Mache Ingredients
    • 2-3 Newspapers, torn into long inch-wide strips
    • Large Mixing Bowl
    • 4 cups white flour
    • 1 1/2 tablespoon salt
    • 3 ounces glue
    • 4 cups water
    • Mixer or stirring spoon
  • Hot Glue Gun
  • Small mosaic tiles or charms (available at craft store)
  • About 6 cups of pre-mixed grout, enough to cover your whole statue
  • 1 sturdy plastic cup
  • Acrylic Paint & Brushes
  • Crystal Clear Spray Enamel
  • Potting soil
  • Seeds, Flowers, Small Plant, or Ivy
  • Ganesha necklaces, scarves and/or bling
Here's How:

  1. Using a Ganesha picture as a reference, and your imagination start piling your boxes and carboard into the shape of a Ganesha.
  2. Blow up your balloon and use for head.
  3. Cut out large pieces of cardboard for ears and crown.
  4. Tape the entire thing together with masking tape until very sturdy.
  5. Mix your flour, salt, glue, and water in the bowl until consistency is even.
  6. Dip your newspaper strips into papier mache glue solution and start covering your cardboard Ganesha with them one by one.  Use several layers so body is sturdy and cover any holes or nooks to make surface smooth and impenetrable.   
  7. After the strips are dry, turn Ganesha over and cover the bottom with strips as well.  
  8. After all strips are dry, start to use hot glue gun to place decorative tiles or charms on eyes, crown, and any other areas you would like with extra decorations.
  9. Once hot glue is dry, start to cover your entire Ganesha in grout, including over your mosaic tiles and your papier mache layers.
  10. Wait about 10 minutes and wipe grout off of your tiles and chrams.  Grout should stay in between the cracks, but be clean and shiny on top of the tiles.  
  11. Cut a few pen sized holes along one edge of your plastic cup.
  12. Hot glue the plastic cup to one of your Ganesha's hands so that the holes are exposed along the back edge of his hand.
  13. Once hot glue is dry, apply mosaic tiles if you want, and cover your cup in grout so it blends in with Ganesha's hand.  Don't cover the holes in grout.    *The purpose of the holes is so when you are watering the plant in the grouted-plastic cup, a little bit of water will be able to drain out the bottom of the cup.
  14. After grout is dry, paint your Ganesha with festive bright colors and designs.
  15. After paint is dry, cover your Ganesha with a coating of Crystal Clear Spray Enamel.  
  16. After Crystal Clear is dry, fill Ganesha's pot with Ivy, flower seeds, potting soil, and whatever else you may choose to include.  
  17. Give your Ganesha a nice home in your entry-way, your favorite altar, or your garden.  *If done correctly, Ganehsa should be weather-proof, but just to be safe you may not want him to live in the spray-line of your sprinklers, or outdoors during rainy months.
  18. Don't forget your Ganesha bling!


Monday, November 30, 2009

Graphic Art Light Box

Everyone has that favorite coffee table book, graphic novel, or assortment of postcards.  Usually these books or mementos end up getting stuffed in a box or left to collect dust on a shelf where people can't enjoy them.  What better way to display these art pieces than a classy light fixture.  Light boxes are fairly easy to make, and offer a really clever and captivating way to display art around your house.


Light Box Unlit


Lit Light Box


You'll Need:
  • Shallow Cardboard Box (department store gift boxes work well)
  • Masking Tape
  • 3 Night Lights (99¢ store bargain)
  • 3 Extension Cords
  • Simple Frames for your Art (Ikea bargain)
  • Hot Glue Gun
  • Color copies of art, graphic novel, or postcards (thin paper shows light through better)
  • 2 colors Spray Paint
  • Painters Tape
Here's How:
  1. Connect your three night lights with the extension cords.
  2. Remove the lid of your box.  Tape the three night lights on the bottom of the inside of the box (evenly spaced apart and in a vertical line).
  3. Cut a small hole in the bottom of the box so the bottom cord has a place to hang out and plug into the wall.
  4. Take the lid of the box and cut three rectangle holes the exact same size as the openings or your frames.
  5. Spray paint the lid of your box one color.
  6. Once base coat has dried, put one strip of painter's tape on each the right and left edges of the lid of your box.  Now spray the lid with your other paint color.  You should end up with two crisp lines down each side of the box.
  7. Spray paint your frames with the first color you used.  Let dry.
  8. Cut your art color copies down and put art in your three frames.  
  9. Using your hot glue gun, glue your three frames onto the corresponding holes you cut.  
  10. Mount your Graphic Art Light Box on the wall, plug in, and enjoy your illuminated art.

Sunday, November 29, 2009

Painted Desk Bell

Ding Dong... Ding Dong!
A bell is a great addition to a shop desk, a receptionist station, or a teachers table.  If there's anywhere this chime-erator might come in handy, or know a friend whose life or profession is lacking in sweet ringing, this bell is a must.  But don't adorn your desk with the boring standard service bell.  Spice things up.  A simple design or painted landscape is a great way to jazz up a simple bell and inspire awe from any potential ringers.


You'll Need:
  • Service Bell (easy to find and fairly inexpensive online or in a novelty shop)
  • Painter's Tape
  • Various Acrylic Paint Colors (Basics is a good brand)
  • A few small acrylic paint brushes
  • Crystal Clear Spray Enamel
Here's How:
  1. Cover the black base and top metal piece of your bell with painter's tape.
  2. Using your acrylic paint and small brushes paint an interesting design on your bell.  The paint does not stick very well to the metal, so it may take a few coats.  If you aren't a natural artist, look up an interesting design online and mimic it on your bell.  Otherwise, just use your imagination.
  3. When the paint has dried spray on a coat of Crystal Clear Spray Enamel.  Let dry and enjoy some sweet ringing!